Welcome back to the second part of Strength Training – Why, What and What Next to Achieve Your Goals. In the last post we explored some of the reasons as to why and how anyone would benefit from a strength training routine as well as introducing the three planes of motion that the body moves through and hense we must train within.
Today’s post is going to introduce a variety of basic movements that will work the three planes of motion discussed. The exercises presented will all be compound exercises, meaning they hit a number of muscles and muscle groups synergistically as opposed to isolating them singularly.
We will start with the lower body then focus on pulling exercises. These exercises are basics that can be adjusted to continue to make gains. Consider them as the basis for your strength workout if starting out or rather a maintenance if you already have a good grounding. Remember though, these exercises also have a strong mobility element so really are transferable to the most hardened gym rat.
I’m going to start with the lower body with a focus on squatting exercises. Squatting is an incredible exercise for each part of the kinetic chain through your lower body, (foot, ankle, knee, hip). When done correctly it will also help to reduce injury through balancing the various muscles, joints and tendons in the leg, whilst improving mobility and flexibility.
Below are some exercises that I’ve compiled. I’ve similarly included some tips I’ve picked up to ensure you get the most bang for your buck..
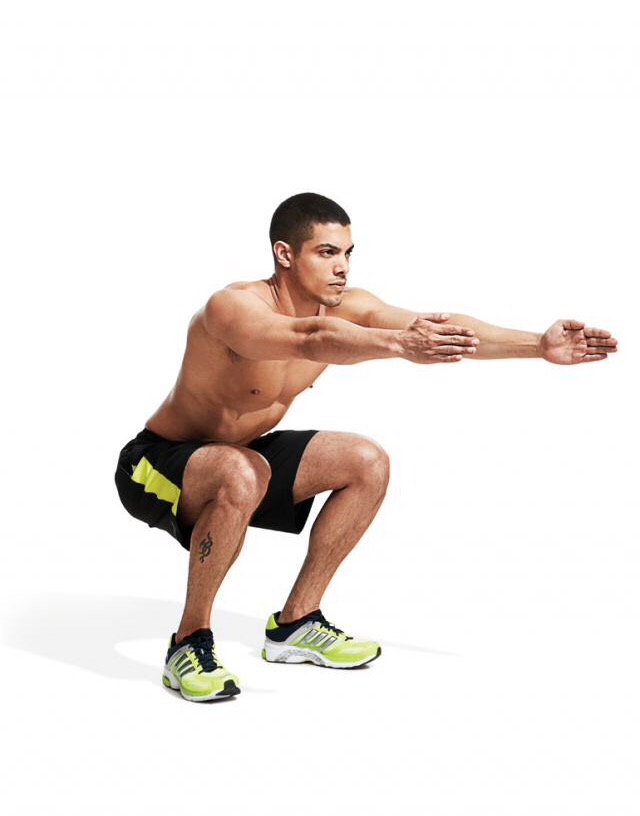
Bodyweight Squat
Although this is as simple one, try these few tips to get maximum results; place a low bench or stall behind you to act as if it were a chair you were sitting back on. This acts to ensure you go fully back and do not over compensate with your knees to hold the weight. If balance is lost, something is there to catch you.
Secondly, try to perform the squat with a wall directly in front of you, as close to your face as possible. This is again to ensure you don’t lean forward placing pressure on the knees. You should continue to see your toes peeping out from under your knees as you perform the exercise.
When completing the exercise grip the floor with your feet to activate your gluteal muscles (bum). Consider you have a corkscrew within the back of your legs driving you down then back up. The movement down and back up should be slow and controlled with your feet pointing straight out. You should only continue up to two thirds of fully standing before then lowering yourself again. This is because within this range you have the least amount of strength and leverage naturally available.
It’s a good idea to complete the exercise initially in front of, and parallel to a mirror. When reaching the bottom of the squat, check the parallel mirror to ensure you are not doing a ‘hoodwink’. This is when allow the bottom of your spine to roll over downwards.
Play around with reps and sets. If done correctly, no matter your experience, you should be feeling a considerable burn at 10 and strong burn at 20. As opposed to continuing higher with the rep count, try slowing down as much as possible. This added time under resistance will serve for greater strength accumulation. Add weight if you like by way of a filled back pack.
Warrior One to Rotational Twist
This is a single leg strengthening exercise which incorporates both the back and abdominal muscles.
As opposed to lunging for a cardio workout, this exercise is supposed to be done slowly and deliberately. It’s a combination of mobility and stability incorporating the benefits of the yoga pose warrior 1, combined with the functional strength building of the lunge and rotational movement. When combined, all three elements of this exercise work through all the three planes of motion.
Start with feet shoulder width apart and take a deep step forward. Keep your upper body straight, with your shoulders back and relaxed and chin up (pick a point to stare at in front of you so you don’t keep looking down). Always engage your core.
Make sure the rear foot is flat on the floor, around 90 degrees turned in and in line with the front foot. The knee should also be perfectly aligned facing straight out forward with the foot. Ensure your upper body and pelvis are level and aligned facing forward.
Extend your arms directly upwards, fingers pointing as high as they can. Lengthen your coccyx toward the floor, and arch your upper torso back slightly. If balance allows, look upwards and place palms together with arms still raised. Ensure you are dropping your shoulders and release any tension from them. Hold the back stretch for 10 deep nose breaths (in through nose/out through nose/mouth).
The pose should look like this:

Following the hold, come onto the toes of your rear foot and drop the knee of the rear leg to form a regular lunging position.
Follow the steps with body weight squat in regards to gripping the floor with your toes, envisioning a corkscrew within the leg and keeping within advised range of motion.
Reverse the back extension to straight back and bring your hands, still in prayer position, extended out in front of you so your looking straight down your extended fingers. Holding the lunge, slowly and deliberately rotate to the left fully round. Hold the position for a breathing cycle of in and out through the nose, then rotate fully in the opposite direction. Return your extended arms to centre for one full repetition.
As with the body weight squat, don’t get to hung up on reps and sets. Play with doing the warrior 1 pose and multiple rotations left and right. Mix this with doing warrior one and a full lunge and one full rotation equalling one repetition. Then return to standing position, repeating the full exercise on the other leg.
Deep Squat Stretch
The deep squat will help you maintain your hip flexion mobility – the ability to squat all the way down – throughout life. The deep squat is commonplace in many Asian and Middle East countries and requires 95-130 degrees of hip flexion and 110-165 degrees of knee flexion, which is an extensive range of motion.
This stretch will serve to not only allow for a greater range of motion but also strengthen the groin, hips and knees. This is essential if you practice any sports or physical activities regularly, ranging from yoga, running or weightlifting.
To do this one just squat down as deep as you can go with your own body weight and remain flat-footed (don’t come up onto the toes). Start with timing it for 30 seconds and look to increase up to a minute. You can increase the stretch to your groin by pushing outwards with the backs or your forearms on your inner thighs as you squat. Try to start with a minimum of 3 days a week moving towards a daily practice.
Hindu Squat
During a Hindu squat, the glutes, quadriceps, hamstrings, calves, abs and shoulders work simultaneously.
The Hindu squat is performed from a standing position with your feet slightly wider than shoulder-width apart and your arms at your sides. In one smooth motion, lower yourself down by bending your knees and raising your heals off the ground. Stop the motion when your thighs are parallel to the ground. When you are at this point, you can either let your arms hang straight down or move them behind your bum and skim your raised heals. Quickly stand up and extend your arms straight in front of your body. Repeat the exercise in a fast and controlled motion. When doing these, keep your back straight and your gaze fixed forward.
If your knees are weak, you can start with a flat heels variation as opposed to the correct knees over toes version until your knees are stronger.
See the below example of the progression through the movement, paying particular notice to the raised heal, upper leg and knee positions.
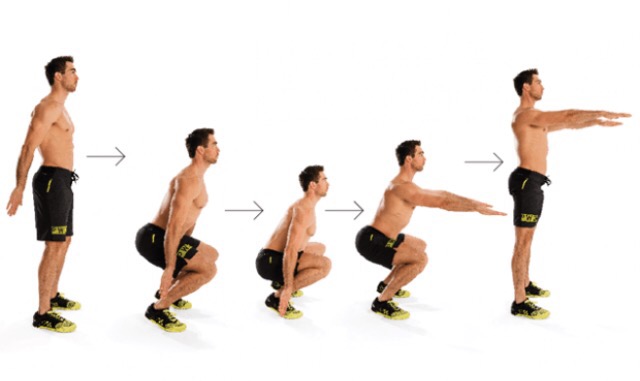
Another key point to be mindful of with the Hindu squat is the breathing pattern. Breath out as you descend towards the floor and the heels raising off the ground. Breathing in, (ideally through nose) push upwards returning the heels to the ground as the arms extend in front of the chest before rowing once more to the start position. Ensure one breath out only for the downward motion and one breath in only for upwards. This rhythm sets your tempo.
In the first instance the squat places much more stress on the quad muscles than your average squatting motion. By shifting your weight onto the toes, much more emphasis is placed upon the front of the thighs, thereby encouraging muscle growth in the upper legs.
The Hindu squat differs from the body squat and lunge as this exercise should be done at speed and as such, also serves as a good cardiovascular workout. Start with 20 repetitions and progress up either with further reps or timed challenges, (ex; 30s, 1mim, 2.5mins, etc).
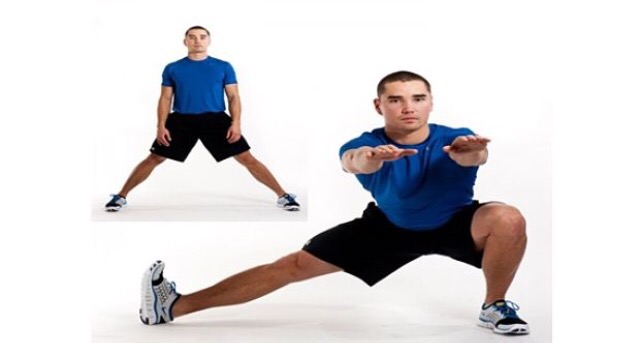
Cossack Squat
Alrighty, last one for the lower body. The Cossack squat. This is both great for building muscle strength as well as being an ideal movement for flexibility and mobility working the lateral plane of movement.
The Cossack squat will serve to improve and/or restoring range of motion in the ankles, knees, and hips in a multi-planar fashion. This is while also improving the elasticity and strength of connective tissue and muscles across various angles and force lines.
Take a wider than shoulder width stance, and turn one foot out to the side with the toe off the floor pointing to the sky. Keep that knee straight, and squat to your other leg, trying to keep both heels on the ground and keeping your spine as straight and tall as possible. Lower as deep as comfortable or until you have to start rounding your spine to get any lower. Return to standing position for one for repetition.
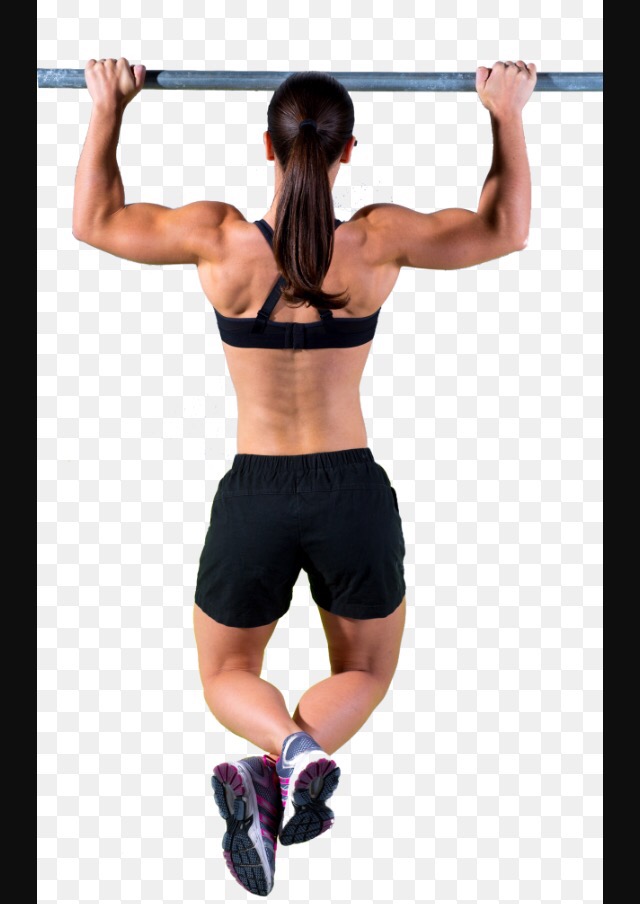
Pull exercises
For the second half of this post we will explore pulling exercises to predominately build the back and arms. As will be seen however, most will also strengthen the whole upper body. Thee go to exercise here is the pull up and chin up. These however can be challenging and there are other exercises that can be utilised either building towards them or used alongside. Again, many of these movements will also seek to increase mobility, alongside functional strength in the upper body.
Crawl
So, this one isn’t an obvious choice! Saying that, crawling does involve both pulling and pushing muscles, it also serves to hit all of the core.
There are several progressions with crawling. Try starting with the bear crawl on the toes and hands. Contract the abs, lower your bum as much as possible and try not to let your hips swing side to side.
To progress this exercise, firstly drop from the hands to using the forearms to move during bear crawling. To progress further from here, next drop the legs to the floor and keep them static. Using only your forearms (hands clasped), try to pull your self along. Now try this with arms fully extended. The final hurdle is a military crawl, with one arm and one leg alternating at a time.
You can even do the crawling exercises in a limited space, reversing the movement. Try playing around with timed repetitions such as 5 sets of 30secs with 15sec breaks in between each rep.
Bodyweight Horizontal Pull
This is a great exercise to build strength in the biggest muscle in the back, the latissimus dorsi. You will need a raised bar but consider improvising if in the home with a heavy duty table for instance.
Lie on the floor underneath the bar (which should be set just above where you can reach from the ground). Grab the bar with an overhand grip (palms facing away from you). Contract your abs, and try to keep your body in a completely straight line.Your ears, shoulders, hips legs, and feet should all be in a straight line. Pull yourself up to the bar until your chest touches the bar. Lower yourself back down.
If you’re still struggling and they’re too difficult, it’s okay. You just need to back up a few steps. Set the bar higher so that when you lean back, your body isn’t down on the ground; maybe it’s only at a 45 degree angle.
Pull/Chin Up Negatives
The negative part of an exercise is when the muscle is contracting eccentrically meaning slowing down the lowering phase of the movement. Completing reps and sets of the negative part of a chin or pull up very slowly is a good building block towards completing the exercise in full. It is also a very good addition to increase the time the muscles are under load when doing straight chin and pull ups.
If just doing the negatives alone. Alternate between a palm down and palm up grip at different widths on a raised bar. Start with a count of one thousand and 1, one thousand and two and so on to three, (adding the one thousand ensures you allow a full second). Try building from the 3 count up to 10. Start with 3 sets of 3 X 3 second repetitions, progressing to 5 sets of 5 X 10 second repetitions.
The Pull Up & The Chin Up
Although there are some variations, some of which I’ll detail in a min, like the squat, this exercise is the daddy in terms of building some overall upper body strength.
The pull up is a palms down, slightly wider than shoulder width grip by which to pull your self up and chin over a pull up bar. The chin up is palms up and hands anywhere between shoulder width going towards being together.
Pull ups typically use shoulder adduction, where the elbows come down and back from the sides.
Chin ups on the other hand use shoulder extension, where the elbows come down and back from the front (neutral grip fits in this category as well). The difference isn’t huge and it doesn’t make one exercise better or worse than the other.
Since chin ups put your biceps in a stronger line of pull, they’ll typically hit your biceps a bit harder than pull ups will. Conversely, pull ups may hit your lats a bit harder, mostly as a result of your biceps being in a slightly weaker position. Grip width also plays a role here too. The narrower your grip is, the more it will train your biceps. The wider the grip, the less it will train your biceps.
Mix it up with one hand over, one under, of just simply change the grips to all possible variations and widths accords the bar.
Hindu Push-up
Lastly, although this exercise would also fit nicely into the final part of this series where we’ll explore pressing exercises more, I decided to include it. This is purely as I have found it particularly beneficial for hitting the lats, shoulder girdle and strengthening the back through the supination of the spine. This is a dynamic full-body movement that will build strength and flexibility in your chest, shoulders, back, hips, and triceps.
Get in position by standing with your feet slightly wider than shoulder-width apart. Bend down and place your hands on the floor while keeping your arms and legs straight. You should look like an upside down human “v” with your butt being the point of the “v” and your head pointing down to the ground.
To perform the Hindu push-up, you’re going to make sort of a swooping motion with your body. Bring your head down and forward by bending your elbows. When your head gets close to the ground, continue moving your torso forward by arching your back and lowering your hips. Your hips will now be near your hands. Make sure to get a good stretch in your back. Return to the starting position and repeat.
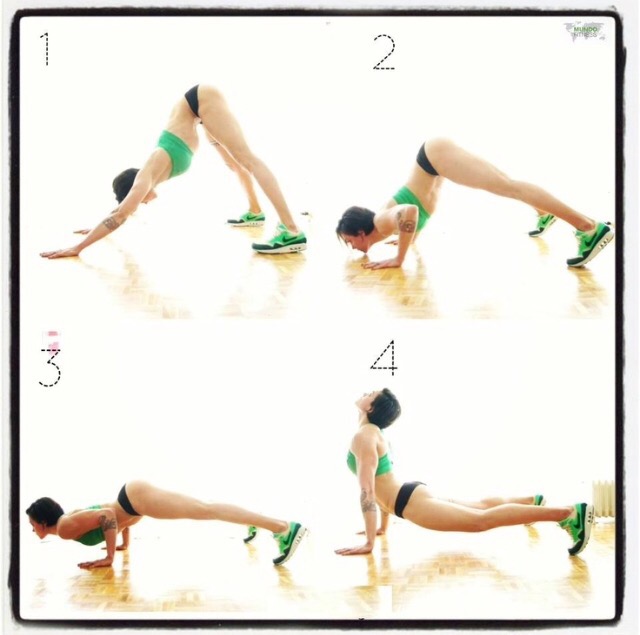
The slower and more control you can give to this movement, the more beneficial it will be overall.
Well, thank you for sticking with me for what has proved a pretty long post! I hope you’ve taken something and please don’t hesitate to ask any questions or even just leave me your thoughts.
Please join me for the final instalment of this series where I’ll explore pressing movements and how to progress on to resistance training that is particularly tailored to athletes who need a sustained level of power and endurance for their choice of activities and sport.