Strength Training – Why, What and What Next to Achieve Your Goals – Part 3


An especially warm welcome back for all those who have stuck through the previous two parts of this post series on strength training! All those who haven’t, I’d firstly advise you please do, but do also stress that there’s still plenty to be going on with right here alone. 

The Strength Training – Why, What and What Next to Achieve Your Goals three part series has presented an introduction to this in-depth subject. 

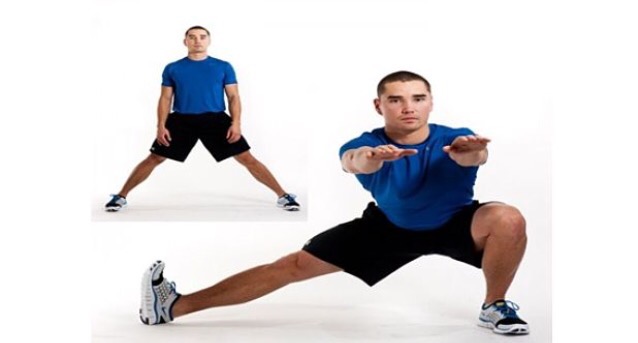
The first post looked at why everyone should incorporate some sort of strength training and the second explored some basic functional bodyweight exercises to increase strength and mobility for both the lower body and the back. 

This final post in the series will detail push exercises to incorporate for the shoulders, chest and arms. I’m purposely not getting too specific on these posts on referencing hitting the triceps (backs of arms) or isolating the upper or lower pectoral muscles (chest),as in my opinion at least, a multi movement approach is generally best for the goal of functional strength. This was covered in the first post of the series where we discussed the three planes of motion the body can travel through; the sagittal, frontal and transverse planes. 

The final part of this post will present an approach to weight lifting that I believe can represent a significant progression for athletic performance. This is not heavy weight training for big chiselled muscles, rather a method that will build both relative and absolute strength as well as strength endurance, which we’ll detail also.

Push & Push exercises 

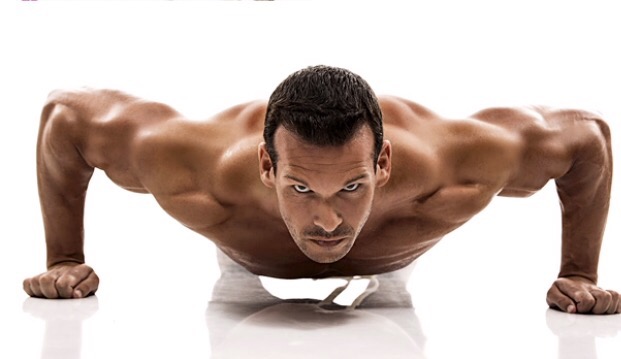
The humble press-up, forever associated with the marines, or the P.E. school teacher who thought his or her role was to train you for said marines. There is however a ton of variety and tweaking that can be done to make the entry level exercise a serious strength developer. 

Press-up

Ok, I’m not going to reinvent the wheel with this one but I am going to give a few tips to make this a more challenging exercise whilst bringing greater strength rewards and ultimately getting more from less.

The vary basics are your initial position. Hips and bum should not be higher than your shoulders, arms (initially) should be just wider than shoulder width and your head up to form a perfectly straight line down the body. 

I now want you to cast your mind back to the first post where I detailed the squat. In this post I discussed feeling like you have coiled springs in your legs. This transfers to the arms now. Push down into the floor and tense both arms as you go down and back up. This is especially effective if you do the press-ups on your fists. 

Doing press-ups on the fists will have a number of benefits including removing pressure from the wrists and serving to strengthen them. It will also mean you need to stabilise your whole body more, serving to work the core more intensely. Try moving the positions of your fists between horizontal to work the chest and shoulders and fists parallel to the body to hit the back of the arms (triceps). 

Lastly, place one foot on top of the other, this will simply intensify the load and again require you stabilise more. 

The Spiral Clock

So I could real off a very very long list of various hand positions to hit different parts of your upper body and arms. However, I’m going to ask a little of your creative minds and to stick with me as I present this metaphor; the spiralled clock.


Essentially imagine a spiral coming out from the centre of your chest that continues to as wide as you can reach. Around the edge are the clock you have your numbers. Quite simply your imagination is the only block here when completing press-ups. 

These multiple variations can hit a variety of different areas in your upper body, predominantly being chest, shoulders and arms. For example, try 12/3 middle spiral, 10/2 inner spiral and 9/3 outer spiral. The more you work varied numbers and depths, the better the overall gains. 

Want to mix it up further (he asks metaphorically)? Try raising your feet or hands. Or even both!

Half moon press up

I wanted to include this exercise due to its rotational element. As discussed previously the body moves through 3 predominant ranges of motion hence the importance of rotational strength training. This exercise will hit all three planes and translates very well for functional upper body strength. 

Start in a bear squat position with your arms fully outstretched, hands shoulder width apart, feet hip width apart, and your knees bent with your bum close to your heels.

 Keeping your body low to the ground, pull yourself through your hands in a pull up motion. At the same time turn your knees and torso out toward the left. This should put more weight onto your right hand. Once your chest is in line with your shoulders and palms, begin to shift little more weight to the left hand and turn your knees and torso out to the right side.

 Once you are fully facing the right side, begin to push yourself backward and turn your torso/knees back to the starting bear squat position. Alternate the side you turn toward while initiating the push up each time. For example, we turned to the left to start the rep described above, so we would perform the next rep by turning to the right.

This push up should be performed in one smooth and seamless motion as if your chest is tracing a semi circle across the floor, and as such, a half moon. This is quite a tough exercise so I’d advise focusing more on a slow and deliberate movement to get the greatest benefit from the full range of movement. So when thinking about reps and sets, keep the rep count low of each set initially. 
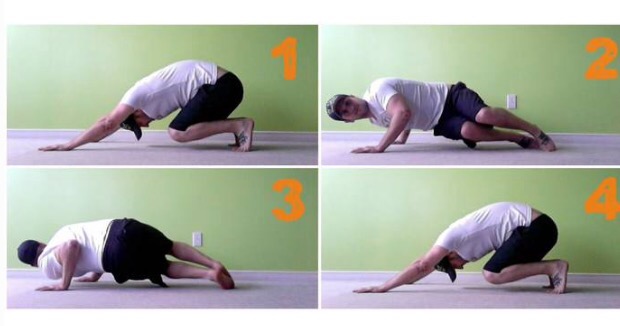
Russian Press-ups

This is a challenging exercise that will especially strengthen the triceps at the back of your arms whilst also building the shoulders and forcing you to stabilise your midsection.

I like to think of this exercise in 4 sections. Get into the standard press up position to begin. Part 1 is dropping into half press up position so your upper and lower arm have a 90 degree angle between them. Part 2. Shift backwards so your forearms are flat on the floor, parallel to your body. For part 3, push back off your forearms into half press-up position again. Part 4 is of course pushing up to start again. Try to complete the exercise in one flowing motion. 

Twisting Press-up

The twisting press-up will work the rotational muscles in your core, and improves flexibility in both your hip and groin muscles. It’s also a slightly easier exercise than the half moon press-up. 

Assume the standard press-up position, but form fists with your hands so your knuckles are flat against the floor. Rotate your hips to the right and cross your right leg in front of your left. Then lower your chest toward the floor as you would for a standard pushup, being careful not to let your hips touch the floor. Push back up and return to the starting position. Repeat with your left leg.

The Intrinsic Strength (IST) Press-Up

Ok, last exercise. IST press-up variations deliver another rotational strength element, but this time to the upper body.

Intrinsic Strength Press-ups offer three variations to the horizontal pushing motion during the same set without having to change the position of the hands. This simple eye gaze over the right and left shoulder allows the muscles to stay engaged, providing the body with greater time under tension while still delivering a variation between between the sagittal and transverse planes (of motion). 

This horizontal rotation is performed by lowering down to the bottom of the push-up while simultaneously taking the eye’s gaze over one of the shoulders. This transverse plane variation causes the shoulders, torso, and hips to rotate to that same side, changing the weight distribution through the arms.


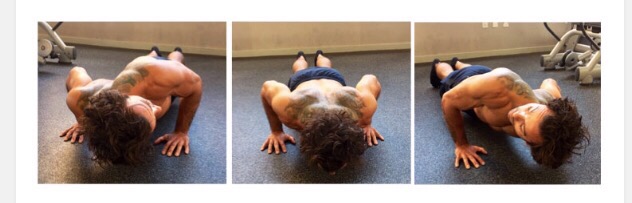
There are basically 3 press-ups to be included in 1 repetition here, this insures you distribute the strain fully over the full chest, back and arms. Start in usual press-up position, feet shoulder width apart. While lowering down to the bottom of the first push-up, simultaneously take your gaze over your right shoulder and return to the high plank position. 

For the second press-up in the repetition, do a regular press-up, returning back to the high plank position on completion. While lowering down to the bottom of the third push-up, simultaneously take your gaze over your left shoulder, completing the same movement as on the first press-up. On completion, return to the high plank position.

Allow every joint to help with the full body rotation. Your eyes will direct your head, shoulders, spine, and hips to rotate towards the same focal point (above the shoulder). Actively apply pressure into the ground through your legs and feet to create lower body tension. Actively apply pressure into the ground through your shoulders and fingers to create upper body tension. When turning the head over the right shoulder, you will feel more weight and tension will shift into the left shoulder and the stretch will be felt throughout the left chest.

Strength 

Alrighty, the progression for the strength training of athletes will now be detailed. Just prior to detailing exactly what MSP training is however, I just quickly want to define exactly what the strength areas that this approach will develop.

Relative strength is the amount of strength to body size, or how strong you are for your size. This reflects a person’s ability to control or move their body through space, a vital trait in athletics. 

Absolute strength is the maximum amount of force exerted, regardless of muscle or body size. Greater amounts of absolute strength favor those with higher bodyweight and in general, larger individuals. Greater absolute strength will improve relative strength capabilities.

Muscular endurance is the ability of a muscle or group of muscles to sustain repeated contractions against a resistance for an extended period of time. In strength training for example, muscular endurance refers to the number of repetitions of a single exercise you can do without needing to stop and rest. 

Lastly, power. Power in the athletic context is defined as the ability to exert a maximal force in as short a time as possible, as in accelerating, jumping and throwing implements. While strength is the maximal force you can apply against a load, power is proportional to the speed at which you can apply this maximal force.

Maximum Sustained Power training 

Maximum sustained power, or MSP , training is an approach using loads that seeks to improve maximum power whilst improving your ability to sustain this maximum power even as you fatigue.

I first became aware of MSP training by reading the great Mark Sisson’s book ‘Primal Endurance’. MSP is a way of training that will build muscle but not purely bulk you out. As highlighted, it can also build power, strength as well as help to reduce the risk of injury. 
If adapting the MSP approach, seek to use big compound exercises, (basically exercises that use more than one muscle group). Examples of such exercises are squats, deadlift, shoulder press, bench press, box jumps, weighted pull/chin and weighted dip. When choosing your weight (or height in the example of box jumps), it’s important that you choose a weight that your able to do a maximum of 5 repetitions of, anymore and you won’t get the desired outcome. 

To conduct an MSP workout I’ll show you the below example. Firstly you’ll lift your new five-repetition maximum weight three or four times, then rest for ten to twenty seconds. This is critical as if you hit 30 seconds or over you’ll loose the benefits. Then you’ll do (for example) three more reps, rest 10/20 secs, do two more, rest, do two more, rest a bit, do two more, rest a bit, then perhaps only muster up one rep on your final “mini-set.” And that party people, is Maximum Sustained Power workout. 

Form is also important here as you’re working with heavy weights. Strength is a skill and therefore incremental increases in weight should be used and form not sacrificed.

 I like to condense the workout into 3 sets of 4 mini sets. The rest breaks between each set of 4 mini sets are critical here. You’ll need to ensure a minimum of 2 minutes in between a full set. There can sometimes be desire in athletes to reduce rest periods to increase intensity. This indeed is essential when seeking to increase purely endurance for example but will not support the development of maximal power and/or strength. MSP workouts are incredibly taxing on the Central Nervous System so allow the two minutes so you can attack the next set of mini sets with equal intensity.

I feel it is necessary to caveat this final piece regarding the enhancing of strength and power in athletic performance by noting that there are tipping points in all modalities of training. When seeking pure explosiveness for example, there a definitely different ways to train to enhance to area. Similarly, periodisation is another key element. That, however my friends, is for another day!

Well, thank you for sticking with me on this post. There’s been a lot of ground covered and I do hope you read the first two posts to get a fuller view of strength training, how and why to implement it into your lifestyle. Until next time, thanks for reading. Please comment and share the love by sharing this article. 

Cheap Eat Nutrition # 27 – Nutritious whole foods on a budget – The Breakfast Fat Bomb! 🔥🔥🔥


Welcome back one and all to the cheap eat nutrition series. Our mission is simple, and that is to provide nutritious whole food options on a budget. 

Today’s recipe is pretty much as simple as simple gets, and will take all of roughly 5 minutes. I call it the breakfast fat bomb, but fear not, this is without doubt the kind of fat you don’t just want, but need in your diet! That’s because the two key ingredients of extra virgin olive oil and avocado are absolutely fantastic sources of monounsaturated fat. 

Before I chew your ear off about the benefits of today’s ingredients however, I just wanted to explain exactly why I like this as a breakfast dish. When switching to a low carb diet, breakfast was a massive challenge for me. Breakfast can also be a make or break meal for many, as if you opt for a high carbohydrate choice, (cereal, toast, simple sugars in juices, jams, etc), then you run the risk of destabilising your blood sugars for the whole day. This in turn can lead to more crashing and binging, and is exactly why the fat bomb is a perfect breakfast option. 

Having a healthy fat containing breakfast is thee way to kick off the day. This is as the fat content (and in this recipe the apple cider vinegar also), will have a hormonal impact that promotes satiety, helping you feel satisfied for longer on less food whilst also acting to balance your blood sugars. 

Just a quick note back on fats. The monounsaturated fats in avocado and olives are similar to polyunsaturated fats in that they are “essential,” meaning that your body doesn’t produce them on its own and must get them via dietary intake. These fats are so important in our diet that monounsaturated fats can help prevent depression, protect you from heart disease and even prevent certain kinds of cancer! To learn a little bit more about the facts about fat, please read this previous post;
http://whatsuppblogblog.com/2017/01/02/the-big-fat-fats-about-fat/

The final ingredient in today’s recipe that may stick out is apple cider vinegar. It’s incredibly important to ensure you get organic fermented ‘with mother’ apple cider vinegar as it is not highly processed. Undergoing fermentation allows the vinegar to form probiotics and enzymes, promoting better digestion through improved gut health. This is not to mention the other related health benefits included both regulation of blood sugars and lowering blood pressure.

Ok, I’ve banged on about the why and the when, lets crack on and look at the how..

Ingredients:

– 1 ripe avocado 

– 2 tble spoons of extra virgin olive oil

– 1 tsp of apple cider vinegar 

– Pinch of chilli flakes 

– Salt & pepper to flavour 

Method:

– Halve the avocado and de stone. Slice length and width ways into cubes.

– Taking a spoon or knife, scoop out the cubed avocado into a bowl.

– In separate bowel, combine the apple cider vinegar and extra virgin olive oil and stir.

– Add the combined liquid to the cubed avocado, add pinch of chilli flakes, salt and pepper. Give a good stir and serve! 👌

Strength Training – Why, What and What Next to Achieve Your Goals – Part 2


Welcome back to the second part of Strength Training – Why, What and What Next to Achieve Your Goals. In the last post we explored some of the reasons as to why and how anyone would benefit from a strength training routine as well as introducing the three planes of motion that the body moves through and hense we must train within. 

Today’s post is going to introduce a variety of basic movements that will work the three planes of motion discussed. The exercises presented will all be compound exercises, meaning they hit a number of muscles and muscle groups synergistically as opposed to isolating them singularly.

We will start with the lower body then focus on pulling exercises. These exercises are basics that can be adjusted to continue to make gains. Consider them as the basis for your strength workout if starting out or rather a maintenance if you already have a good grounding. Remember though, these exercises also have a strong mobility element so really are transferable to the most hardened gym rat. 

I’m going to start with the lower body with a focus on squatting exercises. Squatting is an incredible exercise for each part of the kinetic chain through your lower body, (foot, ankle, knee, hip). When done correctly it will also help to reduce injury through balancing the various muscles, joints and tendons in the leg, whilst improving mobility and flexibility. 

Below are some exercises that I’ve compiled. I’ve similarly included some tips I’ve picked up to ensure you get the most bang for your buck.. 

Bodyweight Squat

Although this is as simple one, try these few tips to get maximum results; place a low bench or stall behind you to act as if it were a chair you were sitting back on. This acts to ensure you go fully back and do not over compensate with your knees to hold the weight. If balance is lost, something is there to catch you. 

Secondly, try to perform the squat with a wall directly in front of you, as close to your face as possible. This is again to ensure you don’t lean forward placing pressure on the knees. You should continue to see your toes peeping out from under your knees as you perform the exercise. 

When completing the exercise grip the floor with your feet to activate your gluteal muscles (bum). Consider you have a corkscrew within the back of your legs driving you down then back up. The movement down and back up should be slow and controlled with your feet pointing straight out. You should only continue up to two thirds of fully standing before then lowering yourself again. This is because within this range you have the least amount of strength and leverage naturally available.

It’s a good idea to complete the exercise initially in front of, and parallel to a mirror. When reaching the bottom of the squat, check the parallel mirror to ensure you are not doing a ‘hoodwink’. This is when allow the bottom of your spine to roll over downwards. 

Play around with reps and sets. If done correctly, no matter your experience, you should be feeling a considerable burn at 10 and strong burn at 20. As opposed to continuing higher with the rep count, try slowing down as much as possible. This added time under resistance will serve for greater strength accumulation. Add weight if you like by way of a filled back pack.  

Warrior One to Rotational Twist  

This is a single leg strengthening exercise which incorporates both the back and abdominal muscles. 
As opposed to lunging for a cardio workout, this exercise is supposed to be done slowly and deliberately. It’s a combination of mobility and stability incorporating the benefits of the yoga pose warrior 1, combined with the functional strength building of the lunge and rotational movement. When combined, all three elements of this exercise work through all the three planes of motion. 
 
Start with feet shoulder width apart and take a deep step forward. Keep your upper body straight, with your shoulders back and relaxed and chin up (pick a point to stare at in front of you so you don’t keep looking down). Always engage your core.

Make sure the rear foot is flat on the floor, around 90 degrees turned in and in line with the front foot. The knee should also be perfectly aligned facing straight out forward with the foot. Ensure your upper body and pelvis are level and aligned facing forward. 

Extend your arms directly upwards, fingers pointing as high as they can. Lengthen your coccyx toward the floor, and arch your upper torso back slightly. If balance allows, look upwards and place palms together with arms still raised. Ensure you are dropping your shoulders and release any tension from them. Hold the back stretch for 10 deep nose breaths (in through nose/out through nose/mouth). 

The pose should look like this: 

Following the hold, come onto the toes of your rear foot and drop the knee of the rear leg to form a regular lunging position. 

Follow the steps with body weight squat in regards to gripping the floor with your toes, envisioning a corkscrew within the leg and keeping within advised range of motion.

Reverse the back extension to straight back and bring your hands, still in prayer position, extended out in front of you so your looking straight down your extended fingers. Holding the lunge, slowly and deliberately rotate to the left fully round. Hold the position for a breathing cycle of in and out through the nose, then rotate fully in the opposite direction. Return your extended arms to centre for one full repetition. 

As with the body weight squat, don’t get to hung up on reps and sets. Play with doing the warrior 1 pose and multiple rotations left and right. Mix this with doing warrior one and a full lunge and one full rotation equalling one repetition. Then return to standing position, repeating the full exercise on the other leg. 

Deep Squat Stretch

The deep squat will help you maintain your hip flexion mobility – the ability to squat all the way down – throughout life. The deep squat is commonplace in many Asian and Middle East countries and requires 95-130 degrees of hip flexion and 110-165 degrees of knee flexion, which is an extensive range of motion.

This stretch will serve to not only allow for a greater range of motion but also strengthen the groin, hips and knees. This is essential if you practice any sports or physical activities regularly, ranging from yoga, running or weightlifting. 

To do this one just squat down as deep as you can go with your own body weight and remain flat-footed (don’t come up onto the toes). Start with timing it for 30 seconds and look to increase up to a minute. You can increase the stretch to your groin by pushing outwards with the backs or your forearms on your inner thighs as you squat. Try to start with a minimum of 3 days a week moving towards a daily practice. 

Hindu Squat

During a Hindu squat, the glutes, quadriceps, hamstrings, calves, abs and shoulders work simultaneously. 

The Hindu squat is performed from a standing position with your feet slightly wider than shoulder-width apart and your arms at your sides. In one smooth motion, lower yourself down by bending your knees and raising your heals off the ground. Stop the motion when your thighs are parallel to the ground. When you are at this point, you can either let your arms hang straight down or move them behind your bum and skim your raised heals. Quickly stand up and extend your arms straight in front of your body. Repeat the exercise in a fast and controlled motion. When doing these, keep your back straight and your gaze fixed forward.

If your knees are weak, you can start with a flat heels variation as opposed to the correct knees over toes version until your knees are stronger. 

See the below example of the progression through the movement, paying particular notice to the raised heal, upper leg and knee positions.


Another key point to be mindful of with the Hindu squat is the breathing pattern. Breath out as you descend towards the floor and the heels raising off the ground. Breathing in, (ideally through nose) push upwards returning the heels to the ground as the arms extend in front of the chest before rowing once more to the start position. Ensure one breath out only for the downward motion and one breath in only for upwards. This rhythm sets your tempo.

In the first instance the squat places much more stress on the quad muscles than your average squatting motion. By shifting your weight onto the toes, much more emphasis is placed upon the front of the thighs, thereby encouraging muscle growth in the upper legs. 

The Hindu squat differs from the body squat and lunge as this exercise should be done at speed and as such, also serves as a good cardiovascular workout. Start with 20 repetitions and progress up either with further reps or timed challenges, (ex; 30s, 1mim, 2.5mins, etc). 

Cossack Squat

Alrighty, last one for the lower body. The Cossack squat. This is both great for building muscle strength as well as being an ideal movement for flexibility and mobility working the lateral plane of movement. 

The Cossack squat will serve to improve and/or restoring range of motion in the ankles, knees, and hips in a multi-planar fashion. This is while also improving the elasticity and strength of connective tissue and muscles across various angles and force lines.

Take a wider than shoulder width stance, and turn one foot out to the side with the toe off the floor pointing to the sky. Keep that knee straight, and squat to your other leg, trying to keep both heels on the ground and keeping your spine as straight and tall as possible. Lower as deep as comfortable or until you have to start rounding your spine to get any lower. Return to standing position for one for repetition. 


Pull exercises

For the second half of this post we will explore pulling exercises to predominately build the back and arms. As will be seen however, most will also strengthen the whole upper body. Thee go to exercise here is the pull up and chin up. These however can be challenging and there are other exercises that can be utilised either building towards them or used alongside. Again, many of these movements will also seek to increase mobility, alongside functional strength in the upper body. 

Crawl

So, this one isn’t an obvious choice! Saying that, crawling does involve both pulling and pushing muscles, it also serves to hit all of the core. 

There are several progressions with crawling. Try starting with the bear crawl on the toes and hands. Contract the abs, lower your bum as much as possible and try not to let your hips swing side to side.

To progress this exercise, firstly drop from the hands to using the forearms to move during bear crawling. To progress further from here, next drop the legs to the floor and keep them static. Using only your forearms (hands clasped), try to pull your self along. Now try this with arms fully extended. The final hurdle is a military crawl, with one arm and one leg alternating at a time.

 You can even do the crawling exercises in a limited space, reversing the movement. Try playing around with timed repetitions such as 5 sets of 30secs with 15sec breaks in between each rep. 

Bodyweight Horizontal Pull

This is a great exercise to build strength in the biggest muscle in the back, the latissimus dorsi. You will need a raised bar but consider improvising if in the home with a heavy duty table for instance.

Lie on the floor underneath the bar (which should be set just above where you can reach from the ground). Grab the bar with an overhand grip (palms facing away from you). Contract your abs, and try to keep your body in a completely straight line.Your ears, shoulders, hips legs, and feet should all be in a straight line. Pull yourself up to the bar until your chest touches the bar. Lower yourself back down.

If you’re still struggling and they’re too difficult, it’s okay. You just need to back up a few steps. Set the bar higher so that when you lean back, your body isn’t down on the ground; maybe it’s only at a 45 degree angle.

Pull/Chin Up Negatives 

The negative part of an exercise is when the muscle is contracting eccentrically meaning slowing down the lowering phase of the movement. Completing reps and sets of the negative part of a chin or pull up very slowly is a good building block towards completing the exercise in full. It is also a very good addition to increase the time the muscles are under load when doing straight chin and pull ups. 

If just doing the negatives alone. Alternate between a palm down and palm up grip at different widths on a raised bar. Start with a count of one thousand and 1, one thousand and two and so on to three, (adding the one thousand ensures you allow a full second). Try building from the 3 count up to 10. Start with 3 sets of 3 X 3 second repetitions, progressing to 5 sets of 5 X 10 second repetitions.

The Pull Up & The Chin Up 

Although there are some variations, some of which I’ll detail in a min, like the squat, this exercise is the daddy in terms of building some overall upper body strength. 

The pull up is a palms down, slightly wider than shoulder width grip by which to pull your self up and chin over a pull up bar. The chin up is palms up and hands anywhere between shoulder width going towards being together.   

Pull ups typically use shoulder adduction, where the elbows come down and back from the sides. 
Chin ups on the other hand use shoulder extension, where the elbows come down and back from the front (neutral grip fits in this category as well). The difference isn’t huge and it doesn’t make one exercise better or worse than the other.

Since chin ups put your biceps in a stronger line of pull, they’ll typically hit your biceps a bit harder than pull ups will. Conversely, pull ups may hit your lats a bit harder, mostly as a result of your biceps being in a slightly weaker position. Grip width also plays a role here too. The narrower your grip is, the more it will train your biceps. The wider the grip, the less it will train your biceps.
Mix it up with one hand over, one under, of just simply change the grips to all possible variations and widths accords the bar. 

Hindu Push-up

Lastly, although this exercise would also fit nicely into the final part of this series where we’ll explore pressing exercises more, I decided to include it. This is purely as I have found it particularly beneficial for hitting the lats, shoulder girdle and strengthening the back through the supination of the spine. This is a dynamic full-body movement that will build strength and flexibility in your chest, shoulders, back, hips, and triceps.

Get in position by standing with your feet slightly wider than shoulder-width apart. Bend down and place your hands on the floor while keeping your arms and legs straight. You should look like an upside down human “v” with your butt being the point of the “v” and your head pointing down to the ground.

To perform the Hindu push-up, you’re going to make sort of a swooping motion with your body. Bring your head down and forward by bending your elbows. When your head gets close to the ground, continue moving your torso forward by arching your back and lowering your hips. Your hips will now be near your hands. Make sure to get a good stretch in your back. Return to the starting position and repeat.

The slower and more control you can give to this movement, the more beneficial it will be overall. 

Well, thank you for sticking with me for what has proved a pretty long post! I hope you’ve taken something and please don’t hesitate to ask any questions or even just leave me your thoughts. 

Please join me for the final instalment of this series where I’ll explore pressing movements and how to progress on to resistance training that is particularly tailored to athletes who need a sustained level of power and endurance for their choice of activities and sport. 

Cheap Eat Nutrition # 26 – Nutritious whole foods on a budget –  Choc Coconut Cookies


And a warm welcome back to the cheap eat nutrition recipe series! I’ve got a comfort recipe for you today which is both a nutritious and tasty alternative to many folk’s favourite comfort sweet treat – the chocolate cookie!

So, upon reading this, I am dearly hoping you’re a fan of the coconut. These brown hairy nutritional powerhouses are a main stay ingredient of this cookie recipe, but should any doubts linger about why you should get more of this tropical delight into your person, have a quick read of this previous short post – http://whatsuppblogblog.com/2017/05/29/snack-hacks-7-coconut/

As keeping with the cheap eat nutrition ethos, this recipe is grain free and very low sugar. I hope you enjoy!

Ingredients:

– 2/3 eggs 

– 1 cup of unsweetened coconut flakes

– 2 tble spoon of unsweetened cocoa powder 

– 2 tble spoons of butter

– 1/2 tsps of honey (for sweetness so adjust accordingly – alternatively try cinnamon or a pinch of stevia to reduce insulin spikes further)

– 1/2 heaped tsps of coconut flower 

– 1 tsp of Almond Extract 

– Pinch of baking soda 

– Half a cup of chopped mixed nuts (optional)

Method:

– Preheat oven to 170c 

– Melt butter and honey in saucepan and put aside to cool

– Whisk eggs in large mixing bowel 

– Add all ingredients aside from coconut flour. Mix contents thoroughly together including butter and honey.

– Gradually add coconut flour, mixing to a thick consistency 

– Spoon out mixture into cookie sized portions on the parchment paper covered baking tray 

– Bake in oven for 20/30 minutes. Allow to stand and cool, then serve and enjoy!